Working with PowerShell Jobs
PowerShell Jobs is very effective way to achieve faster, recently I used to work with it and provides big improvements, but it shouldn’t be used in all cases, but only when you need your Script to run in parallel threading
for example, if you you have 1000 files, and you want to run powershell script to process it, you can split your script to run for 100 file per job, and this will optimize running time by over 80%
but still PowerShell jobs is a bit tricky in executing and debugging, in this post will summarize what you really want to use PowerShell Jobs efficiently
for($i =0; $i -lt 5; $i++)
{
$job=Start-Job -Name "Job-$i" -ScriptBlock {
    Start-Sleep -s 5
    $x = 10
    $z = $x + 5
    (Get-Random -Minimum 1 -Maximum 1000).ToString()   >> "C:\temp\file.txt"
   }
}

Debug-Job -Job $job;
Debugging process is also tricky, you should be aware of few things
- The .ps1 file must be saved before debugging
- Write-host will not work in the job, instead use Out-file to write in a log file
- Put break point on the Debug-Job line
- If the job ends quickly then debug will not work, make the function run for longer, by adding “start-sleep -s 5” in the job it self, like in the above example
If you want to bypass a parameter to the Job, you can do this in many ways
- Pass parameter directly to the job, using $input method, like the below (Please make sure to use $input word (case sensitive), otherwise it will not work
for($i =0; $i -lt 5; $i++)
{
$job=Start-Job -Name "Job-$i" -InputObject $i -ScriptBlock {
    Start-Sleep -s 10
    $z = $input
    $input   >> "C:\temp\file.txt"
   }
}

Debug-Job -Job $job;
2. The job only takes one single input, you can send array of string as object in this input, and process it in the job
3. you can write your input in a file, and then the job read it
In general I prefer to use file with jobs, it is easier in handling like the below
for($i =0; $i -lt 5; $i++)
{
$job=Start-Job -Name "Job-$i" -InputObject $i -ScriptBlock {
    Start-Sleep -s 5
    C:\Temp\otherscript.ps1 -param1 $input

   }
}
Please leave me a comment if you face any issues with the Jobs
Regards
How to read Excel files without having Excel installed on your machine using .NET ?
Luckily, there is a way to read from Excel files that has (*.xlsx) or (*.xls) extensions, without having Office Excel installed on your machine.This way can be used with .NET Windows, or Webs, also can be used with PowerShell, however, I will address below how to use it with .NET only in details, and will give some guidance how to use it with PowerShell
1. Open your visual studio, and Create a new .NET Project (web app, or windows app, or other) with .NET v4.0 or more
2. Create a new Class, and lets name it “ExcelAdapter.cs”
3. Paste the blow block in “ExcelAdapter.cs”
using System;
using System.Collections.Generic;
using System.Linq;
using System.Text;
using System.Threading.Tasks;
using DocumentFormat.OpenXml;
using DocumentFormat.OpenXml.Packaging;
using DocumentFormat.OpenXml.Spreadsheet;
using System.Data;
using System.Globalization;
namespace ExcelReader
{
public class ExcelAdapter
{
public static DataTable ReadExcel(string path, string sheetName)
{
var data = new DataTable();
using (SpreadsheetDocument spreadsheetDocument = SpreadsheetDocument.Open(path, false))
{
// Get the worksheet we are working with
var sheets = spreadsheetDocument.WorkbookPart.Workbook.Descendants<Sheet>().Where(s => s.Name == sheetName);
var worksheetPart = (WorksheetPart)spreadsheetDocument.WorkbookPart.GetPartById(sheets.First().Id);
var worksheet = worksheetPart.Worksheet;
var sstPart = spreadsheetDocument.WorkbookPart.GetPartsOfType<SharedStringTablePart>().First();
var ssTable = sstPart.SharedStringTable;
// Get the CellFormats for cells without defined data types
var workbookStylesPart = spreadsheetDocument.WorkbookPart.GetPartsOfType<WorkbookStylesPart>().First();
var cellFormats = workbookStylesPart.Stylesheet.CellFormats;
ExtractRowsData(data, worksheet, ssTable, cellFormats);
}
return data;
}
private static void ExtractRowsData(DataTable data, Worksheet worksheet, SharedStringTable ssTable, CellFormats cellFormats)
{
var columnHeaders = worksheet.Descendants<Row>().First().Descendants<Cell>().Select(c => Convert.ToString(ProcessCellValue(c, ssTable, cellFormats))).ToArray();
var columnHeadersCellReference = worksheet.Descendants<Row>().First().Descendants<Cell>().Select(c => c.CellReference.InnerText.Replace("1", string.Empty)).ToArray();
var spreadsheetData = from row in worksheet.Descendants<Row>()
where row.RowIndex > 1
select row;
foreach (string columnHeader in columnHeaders)
{
data.Columns.Add(columnHeader);
}
foreach (var dataRow in spreadsheetData)
{
var newRow = data.NewRow();
for (int i = 0; i < columnHeaders.Length; i++)
{
// Find and add the correct cell to the row object
var cell = dataRow.Descendants<Cell>().Where(c => c.CellReference == columnHeadersCellReference[i] + dataRow.RowIndex).FirstOrDefault();
if (cell != null)
newRow[columnHeaders[i]] = ProcessCellValue(cell, ssTable, cellFormats);
}
if (!newRow.ItemArray.All(field =>
{
string s = null;
if (field != null)
s = field.ToString();
return string.IsNullOrEmpty(s);
}))
data.Rows.Add(newRow);
}
}
// Process the valus of a cell and return a .NET value
private static Func<Cell, SharedStringTable, CellFormats, Object> ProcessCellValue =
(c, ssTable, cellFormats) =>
{
if (c.CellValue == null) return null;
// If there is no data type, this must be a string that has been formatted as a number
if (c.DataType == null)
{
if (c.StyleIndex == null) return c.CellValue.Text.Trim();
var cf =
cellFormats.Descendants<CellFormat>()
.ElementAt<CellFormat>(Convert.ToInt32(c.StyleIndex.Value));
if (cf.NumberFormatId >= 0 && cf.NumberFormatId <= 13) // This is a number
return double.Parse(c.CellValue.Text, NumberStyles.Any);
if (cf.NumberFormatId >= 14 && cf.NumberFormatId <= 22) // This is a date
return DateTime.FromOADate(Convert.ToDouble(c.CellValue.Text));
return c.CellValue.Text.Trim();
}
switch (c.DataType.Value)
{
case CellValues.SharedString:
return ssTable.ChildElements[Convert.ToInt32(c.CellValue.Text)].InnerText.Trim();
case CellValues.Boolean:
return c.CellValue.Text == "1";
case CellValues.Date:
return DateTime.FromOADate(Convert.ToDouble(c.CellValue.Text));
case CellValues.Number:
return double.Parse(c.CellValue.Text, NumberStyles.Any);
default:
return c.CellValue != null ? c.CellValue.Text : string.Empty;
}
};
public static List<string> GetSheet(string filename)
{
DataTable dataTable = new DataTable();
List<string> list = new List<string>();
using (SpreadsheetDocument spreadsheetDocument = SpreadsheetDocument.Open(filename, false))
{
IEnumerable<Sheet> enumerable = spreadsheetDocument.WorkbookPart.Workbook.Descendants<Sheet>();
foreach (Sheet current in enumerable)
{
list.Add(current.Name);
}
}
return list;
}
}
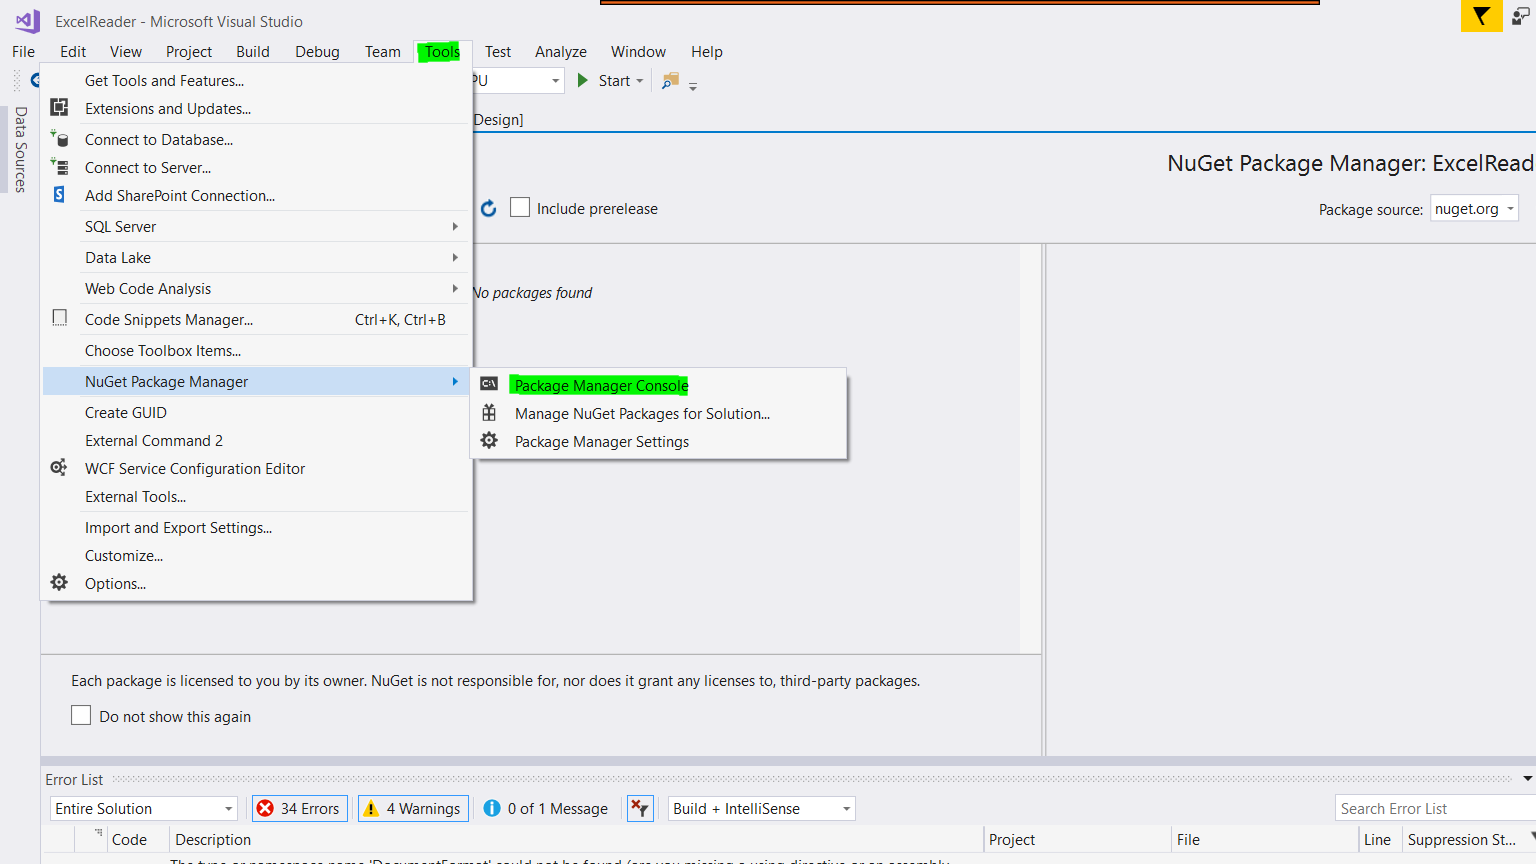
}4. This is an open source library, To install it you need to open “Package Manage Console” in visual studio and then run this command : Install-Package DocumentFormat.OpenXml -Version 2.9.1

5. If you cannot see the Package manage console, please show it from Tools > NuGet Package Manager > Package Manager Console
6. If you prefer to do it manually, you can search google on DocumentFormat.OpenXml, download the .dll, and use add to reference
7. Now the Document Format should be installed in your project, check the references to confirm
8. Rebuild the project, should be no errors
9. To start using the functions create a new form, or class, and start using the functions, this function will return list of sheets in the excel file
List<string> sheets = ExcelAdapter.GetSheet(@"C:\temp\file.xlsx");10. Now we will get the data in one of the sheets, and load it to a datatable, then to DataGrid, to do this write the below
DataTable dt = ExcelAdapter.ReadExcel(@"C:\temp\file.xlsx", "Sheet1");//please be aware that Sheet1 is case sensitive!
 this.dataGridView1.DataSource = dt;
 //Please don't forget to add databind if you are using with asp.net
12. and you will have your Dataload as below
If you want to use it with PowerShell, it will be a little bit more complicated, you will need first to, convert this module to *.dll then reference it to your PowerShell script like in this link
https://activedirectoryfaq.com/2016/01/use-net-code-c-and-dlls-in-powershell/
Get InfoPath Usage in your SharePoint Online site using PowerShell
I was involved recently in a project to get InfoPath usage in SharePoint Online site.
This script is useful to know How many InfoPath file is created in your Site/Tenant, it also differentiate between InfoPath path form, and InfoPath Custom list form.
This also works on SharePoint 2013 & SharePoint 2016 as it is relying on Client Object Model, but you will point to SP2013/SP2016 Client dlls
[System.Reflection.Assembly]::LoadWithPartialName("Microsoft.SharePoint.Client")

[System.Reflection.Assembly]::LoadWithPartialName("Microsoft.SharePoint.Client.Runtime")

Function Get-SPOContext([string]$Url,[string]$UserName,[string]$Password)

{

    $SecurePassword = $Password | ConvertTo-SecureString -AsPlainText -Force

    $context = New-Object Microsoft.SharePoint.Client.ClientContext($Url)

    $context.Credentials = New-Object Microsoft.SharePoint.Client.SharePointOnlineCredentials($UserName, $SecurePassword)

    return $context

}

$Header = "Site Url; Web Url; Base Template; List Title; Item Count; "

$UserName = "sitecollectionadmin@site.onmicrosoft.com"

$Password = Read-Host -Prompt "Password"

$Url = "https://tenant.sharepoint.com/sites/yoursite"

$context = Get-SPOContext -Url $Url -UserName $UserName -Password $Password

$site = $context.Site

$context.Load($site)

$context.ExecuteQuery()

$rootWeb = $site.RootWeb

$context.Load($rootWeb)

$context.ExecuteQuery()

$webs = $rootWeb.Webs

$context.Load($webs)

$context.ExecuteQuery()

$AllWebs= @()

$AllWebs += $rootWeb

$AllWebs += $webs

foreach ($web in $AllWebs)

{

    $web.Url

    $context.Load($web)

    $context.ExecuteQuery()

    $lists = $web.Lists;

    $context.Load($lists)

    $context.ExecuteQuery()

    foreach ($list in $lists)

    {

        $context.Load($list)

        $context.ExecuteQuery()

        #Write-Host $list.Title $list.BaseTemplate -ForegroundColor Yellow

        if($list.BaseTemplate -eq 115 )

        {

            Write-Host "XML InfoPath Forms " $list.Title $list.BaseTemplate -ForegroundColor Green

        }

        elseif ($list.BaseTemplate -ne 101)

        {

             $context.Load($list.ContentTypes);

             $context.ExecuteQuery();

            if($list.ContentTypes.Count -gt 0)

            {

                $context.Load($list.ContentTypes[0]);

                $context.ExecuteQuery();

                if ($list.ContentTypes[0].EditFormUrl.Contains("editifs.aspx"))

                {

                    Write-Host "Custom InfoPath List :" $list.Title $list.BaseTemplate -ForegroundColor Cyan

                }

            }

        }

    }

}

$context.Dispose()
You an adjust the script to output the results to csv or excel
Please leave me a comment if you faced any issues with it
Enjoy !
Extract Audit Logs for Office 365 Services using PowerShell
It was always confusing while using Search-UnifiedAuditLog, because you need first to load Exchange libraries.
In this script we will retrieve the Audit logs from Office 365 for the below services
- Skype for Business
- Exchange
- Yammer
- OneDrive for Business
- SharePoint Online
Please be aware that the command “Search-UnifiedAuditLog” will never loads until you load the Exchange New-PSSession -ConfigurationName Microsoft.Exchange, this means you have to use the Tenant admin to execute the below code.
The extraction will be very useful to get audit logs for your Office 365 Services, and it will be extracted to CSV files
$Username  = "tenant.admin@henkel.com"

$TenantODFBUrl = "https://tenant-my.sharepoint.com"

$TenantAdminUrl = "https://tenant-admin.sharepoint.com"

$Pass = "PaSSword!"

[String]$Output = ".\report_$((Get-Date -uformat %Y%m%d).ToString()).csv"

$usersList = Get-Content "C:\temp\TargetUsers.txt"

$cred = [System.Net.CredentialCache]::DefaultCredentials

[System.Net.WebRequest]::DefaultWebProxy.Credentials = $cred

$creds = New-Object System.Management.Automation.PSCredential($Username,(ConvertTo-SecureString $Pass -AsPlainText -Force));

$session = New-PSSession -ConfigurationName Microsoft.Exchange -Authentication Basic -ConnectionUri https://ps.outlook.com/powershell -AllowRedirection:$true -Credential $creds

Import-PSSession $session -AllowClobber

$startDate =  $(Get-Date).AddDays(-60).Date

$endDate =   $(Get-Date).AddDays(-1).Date

Search-UnifiedAuditLog -StartDate $startDate -EndDate $endDate -ResultSize 5000  |Sort-Object CreationDate -Descending | Export-Csv  .\SearchResult.csv -NoTypeInformation

#Skype for Business

Search-UnifiedAuditLog -StartDate $startDate -EndDate $endDate   -RecordType "SkypeForBusinessCmdlets","SkypeForBusinessPSTNUsage","SkypeForBusinessUsersBlocked" |Sort-Object CreationDate -Descending  | Export-Csv  .\SkypeSearchResult.csv -NoTypeInformation

#Exchange

Search-UnifiedAuditLog -StartDate $startDate -EndDate $endDate  -RecordType "ExchangeAdmin","ExchangeItemGroup","ExchangeItem","ExchangeAggregatedOperation" |Sort-Object CreationDate -Descending  | Export-Csv  .\ExchangeSearchResult.csv -NoTypeInformation

#Yammer

Search-UnifiedAuditLog -StartDate $startDate -EndDate $endDate -UserIds  $usersList -RecordType "yammer" |Sort-Object CreationDate -Descending  | Export-Csv  .\YammerSearchResult.csv -NoTypeInformation

#OneDriveForBusiness

$OneDriveworkload = '*"Workload"' + ":" + '"OneDrive"*'

Search-UnifiedAuditLog -StartDate $startDate -EndDate $endDate -UserIds  $usersList   | Where-Object {$_.AuditData -like $OneDriveworkload } |Sort-Object CreationDate -Descending  | Export-Csv  .\OneDriveSearchResult.csv -NoTypeInformation

#SharePoint Online

$workload = '*"Workload"' + ":" + '"SharePoint"*'

Search-UnifiedAuditLog -StartDate $startDate -EndDate $endDate -UserIds  $usersList -RecordType "SharePointFileOperation","SharePoint","SharePointSharingOperation" | Where-Object {$_.AuditData -like $workload} |Sort-Object CreationDate -Descending  | Export-Csv  .\SPSearchResult.csv -NoTypeInformation
Please leave me a comment if you faced any issues with it
Regards !
Check if PowerBI Workspace exists using Get-UnifiedGroup PowerShell Command
We will validate if Certian PowerBI workspace exists or not using Get-UnifiedGroup PowerShell Command in this link
The Get-UnifiedGroup is a little bit tricky because you cannot Load it unless you setup a Microsoft.Exchange connection through O365, and after than you can use the Get-UnifiedGroup command
The below PowerShell script is connected to O365 Exchange then get the unified Group.
Any PowerBI Workspace created is associated with O365 Group, If the workspace is deleted for any reason, the O365 Group will be deleted accordingly.
The Group Id should be part of the Workspace PowerBI Url as follow:

$Username = "admin@tenant.onmicrosoft.com"

$Password = "P@ssw0rd"

[System.Net.WebRequest]::DefaultWebProxy.Credentials = [System.Net.CredentialCache]::DefaultCredentials

$creds = New-Object System.Management.Automation.PSCredential($Username,(ConvertTo-SecureString $Password -AsPlainText -Force));

$session = New-PSSession -ConfigurationName Microsoft.Exchange -Authentication Basic -ConnectionUri https://ps.outlook.com/powershell -AllowRedirection:$true -Credential $creds

Import-PSSession $session -AllowClobber

Get-UnifiedGroup -Identity 05cb4ff7-7bcb-4f71-a8f9-f9135ed7a577
Please leave a comment if you faced any issues while running this script
How to Remove Duplicates items in SharePoint Online List and keep one by PowerShell ?
Hello folks,
We have faced recently a critical situation with a customer:
He was running a certain PowerShell script to update a SharePoint Online list with Data, it reaches 7000 items, a certain issue occurred in the script, and he found that he as 20,000 items in the same list, 70% was duplicates.
He wants to solve the situation in a safe way with no risk, by removing duplicate items and keep the Original one.
To solve the situation I did the following, This solution can be applied on all SharePoint versions 2010, 2013, 2016, & SharePoint Online, as the script is written to work as Client Object Model.
-
-
- I took back-up from the List, if you use SharePoint On-premise version, you can take back-up of the site. If you are using SharePoint Online, you can use Sharegate, however this step is not mandatory.
- Export AllItems to Excel using the Excel action in the ribbon, and make sure the ID Column is part of the export.

- Download and setup a free tool named Kutools for Excel from here , the page contains also description how to use it to mark the duplicated column.
- Now take of the IDs from the Excel, and paste it in a text file on your harddrive

- Then run the below PowerShell Script
Add-Type -Path "C:\Path\SPOnline\Microsoft.SharePoint.Client.dll"

Add-Type -Path "C:\Path\SPOnline\Microsoft.SharePoint.Client.Runtime.dll"

$siteurl = "https://tenant.sharepoint.com/sites/yourSite/"

$UserName = "siteadmin@tenant.onmicrosoft.com"

$SecurePassword = Read-Host -Prompt "Please enter your password" -AsSecureString

$Credentials = New-Object -TypeName System.Management.Automation.PSCredential -argumentlist $userName, $SecurePassword

$SPOCredentials = New-Object Microsoft.SharePoint.Client.SharePointOnlineCredentials($UserName, $SecurePassword)

$context = New-Object Microsoft.SharePoint.Client.ClientContext($siteurl)

$context.Credentials = $SPOCredentials

$web = $context.Site.RootWeb

$context.Load($web)

$context.Load($web.Lists)

$context.ExecuteQuery()

$listTitle = "List Name"

$list = $Context.Web.Lists.GetByTitle($listTitle)

$Context.Load($list)

$Context.ExecuteQuery()

$TargetSites = Get-Content "C:\temp\List-of-Ids.txt"

foreach ($targetSite in $TargetSites)

{

$id=$targetSite.Split(";")[0]

$caml = @"<View Scope="RecursiveAll"><Query><OrderBy><FieldRef Name='ID' Ascending='TRUE'/></OrderBy><Where><Eq><FieldRef Name='ID' /><Value Type='Number'>$id</Value></Eq></Where></Query><RowLimit Paged="TRUE">1</RowLimit></View>"

$query = new-object Microsoft.SharePoint.Client.CamlQuery

$query.ViewXml = $caml

$items = $list.GetItems($query)

$Context.Load($items)

$Context.ExecuteQuery()

if ($items.Count -gt 0)

{

for ($i = $items.Count-1; $i -ge 0; $i--)

{

Write-Host "Deleted: " $items[$i].Id.ToString() -ForegroundColor Yellow

}

$Context.ExecuteQuery()

}

}

#$context.Dispose()
Now, the items will start to be deleted, you can change the PowerShell script to fits your need.
This method is safe because you see exactly what do you want to delete before executing the deletion script -


Create Test Microsoft O365 Group and Delete it
If you are involved in rolling-out of Microsoft Teams or groups recently, then you may need a test script to create temporary O365 Groups
Using the below PowerShell script, you will be able to do so
Pre-requisites:
——————
You should have :
- Client Id
- Client Secret
- tenant admin Url & Credentials
function Test-Group {

##Get Access Token

$body = @{

scope="https://graph.microsoft.com/.default";

client_id=$AppID;

client_secret=$AppSecret;

grant_type="client_credentials";

}

$accessToken = (Invoke-RestMethod `

-Uri https://login.microsoftonline.com/$AADDomain/oauth2/v2.0/token `

-Method POST `

-Body $body `

-Headers @{"Accept" ="application/json"; "Content-Type"="application/x-www-form-urlencoded"}).access_token

##Create Group

$body = @{

displayName="$prefix$suffix";

description="$prefix$suffix";

groupTypes= @("Unified");

mailEnabled="true";

mailNickname="$prefix$suffix";

securityEnabled="false";

visibility="Private";

#"owners@odata.bind"=@("https://graph.microsoft.com/v1.0/users/5a97df74-a0c9-4fb9-8f9f-26bd29d4bf06");

}| ConvertTo-Json

$NewGroup = (Invoke-WebRequest `

-Uri https://graph.microsoft.com/v1.0/groups `

-Method POST `

-Body $body `

-Headers @{"Authorization" = "Bearer $accessToken"; "Accept" ="application/json"; "Content-Type"="application/json"} )

$NewGroupId = ($NewGroup.Content | ConvertFrom-Json).Id

##Check if group was provisioned

$success = $false

$time = [System.Diagnostics.Stopwatch]::StartNew()

for ($i=0; $i -lt 60; $i+=5) {

Start-Sleep -s 5

try{

Invoke-WebRequest `

-Uri https://graph.microsoft.com/v1.0/groups/$NewGroupId/drive `

-Headers @{"Authorization" = "Bearer $accessToken"; "Accept" ="application/json";} | Out-Null

$success = $true

break

}catch [System.Net.WebException]{

If ($_.Exception.Response.StatusCode.Value__ -ne 404){

throw

}

}

}

if($success){

##Delete Group, you can leave it or keep it based on your needs

# Invoke-RestMethod `

#    -Uri https://graph.microsoft.com/v1.0/groups/$NewGroupId `

#   -Method Delete `

#  -Headers @{"Authorization" = "Bearer $accessToken"; "Accept" ="application/json";} | Out-Null

} else {

Write-Host ModernGroup failed to provision in ([Math]::floor($time.Elapsed.TotalSeconds)) seconds -ForegroundColor Red

Write-Host GroupId: $NewGroupId -ForegroundColor Red

Write-Host CorrelationId: $NewGroup.Headers.'request-id' -ForegroundColor Red

Write-Host Date: $NewGroup.Headers.'Date' -ForegroundColor Red

}

}

$AppID = 'xxxxxxx-xxxx-xxxx-xxxxx-xxxxxxxxxxxx' #Put your AppId

$AppSecret = '**********************************' #Put your Secret

$AADDomain = 'yourtenant.onmicrosoft.com'

for ($i=0; $i -lt 1; $i++) {

$suffix = (Get-Date).Ticks

$prefix = "MSFT_Test_"

Test-Group

}
At the End you will have a test group created
Get SharePoint Online Event Receivers
In this article we will get list of Event receivers attached to SiteCollection or Web Levels.
Please follow these steps :
- Make sure Microsoft.SharePoint.Client.dll and Microsoft.SharePoint.Client.Runtime.dll
- Open PowerShell ISE & Run the Below script after setting the target parameter
# Paths to SDK. Please verify location on your computer.

Add-Type -Path "c:\Program Files\Common Files\microsoft shared\Web Server Extensions\16\ISAPI\Microsoft.SharePoint.Client.dll"

Add-Type -Path "c:\Program Files\Common Files\microsoft shared\Web Server Extensions\16\ISAPI\Microsoft.SharePoint.Client.Runtime.dll"

#declare the variables

$tenantSite = "https://tenant-admin.sharepoint.com"

#read file

$siteurl = "https://tenant.sharepoint.com/teams/site1"

$UserName = "admin@tenant.onmicrosoft.com"

$SecurePassword = Read-Host -Prompt "Please enter your password" -AsSecureString

$Credentials = New-Object -TypeName System.Management.Automation.PSCredential -argumentlist $userName, $SecurePassword

$SPOCredentials = New-Object Microsoft.SharePoint.Client.SharePointOnlineCredentials($UserName, $SecurePassword)

Connect-SPOService -Url $tenantSite -Credential $Credentials

$context = New-Object Microsoft.SharePoint.Client.ClientContext($siteurl)

$context.Credentials = $SPOCredentials

$web = $context.Site.RootWeb #You can make it only $context.Site if you want to get the Events on Site Collection level

$context.Load($web)

$context.Load($web.EventReceivers)

$context.ExecuteQuery()

$eventReceivers = $web.EventReceivers

foreach($eventReceiver in $eventReceivers)

{

Write-Host $eventReceiver.ReceiverId "  " $eventReceiver.EventType.ToString() "  " $eventReceiver.ReceiverName

}
- Output will be as follow

Of course the above script can be modified to be compatible with If you want to verify your results, you can use SharePoint Client Browser (SPCB)
It is a free helpful open source tool that can give you nice insights about your Site/Web event receivers and it supports 3 versions (SP2013, SP2016, & SPOnline)

Get SharePoint Admins for All SharePoint Online Sites
In this article we will get list of all SharePoint Online Sites, and then List Site Admins using PnP library
Please follow these steps :
-
-
- Set-up PnP module latest version from here https://github.com/SharePoint/PnP-PowerShell/releases
- Run the Below script after setting the target parameter
#Connect to SPO tenant

$CurrentCred = Get-Credential

Connect-SPOService "https://tenant-admin.sharepoint.com" -Credential $CurrentCred

#Get all Site collections

$sites = Get-SPOSite -Limit All

foreach ($site in $sites)

{

Connect-PnPOnline -Url $site.Url -Credential $CurrentCred

$admins = Get-PnPSiteCollectionAdmin | select Title #You can also add ,Email

$allAdmins=""

foreach($admin in $admins)

{

$allAdmins += $admin.Title +";" #You can have also $admin.Email

}

Write-host ($site.Url+","+$allAdmins) -ForegroundColor Green

($site.Url+","+$allAdmins) >> "C:\temp\SiteCollectionAdmins.csv"

}
-
Then you will have a CSV file with SiteUrl & Site Admin Name delemited by ;
